

Showing posts with label Tutorial. Show all posts
Showing posts with label Tutorial. Show all posts
Thursday, December 16, 2010

Thursday, May 13, 2010
New Feature
In the side bar I added a page where you can see the latest tutorials made by me... Seeings I have no new graphics atm I thought why not show you the tutorial here. Please comment :)


update: write in comments what you would like to see next in a tutorial
xoxoxoxox
Sunday, December 27, 2009
Tutorial - How to Make Your Own Shoes: Heels
http://www.topshareware.com/PhotoStudio-download-13795.htm Download and install for this tutorial to work.

1. Select the outside of a heel.
2. Color it in a nice color.3. Select the spots where you want the lighten parts.
4. Set the transparency to 97 and keep coloring in until you are happy with what you got.
5. Darken the part of the heel that's behind the actual shoe with the darken tool.6. Add details to it like patterns etc and go around the crooked bits with the smudge tool.
coming soon - make your own hairstyles with photostudio
x
Eliza
Tutorial - Make Your Own Clothes: Dress
http://www.topshareware.com/PhotoStudio-download-13795.htm Download and install for this tutorial to work.
Open up PhotoStudio and open up the pose you created with me earlier. Now with the selection tool, select a dress like I did.


transparency 92


Open up PhotoStudio and open up the pose you created with me earlier. Now with the selection tool, select a dress like I did.

You may need to use the shift selection and make the front side and then make the back side so it looks so much neater. I selected a nice clean grey for this dress, which the shading will come out amazingly good.

The grey looks nice and clean and gives a good delicate look. The shading will turn out better with the colors rather than the lighten and darken tool. It is a life saver...
Select the parts you want to shade, I simply wanted to shade the curve that was in the dress at the front. I chose a darker shade of grey and with the free select tool I selected where I wanted the shade to be and colored it in.
Select the parts you want to shade, I simply wanted to shade the curve that was in the dress at the front. I chose a darker shade of grey and with the free select tool I selected where I wanted the shade to be and colored it in.


transparency 92
The transparency gives a good shading at times, and it will over time steal your heart. Now select a part on the big curve and change the color to white. Start drawing massive ovals and over lap them until it looks like this:

transparency 92
See how much good it looks already? Doesn't it look like it's shining? Now lets go up to the bust part of the dress. Select a random shape like so in the image below:
See how much good it looks already? Doesn't it look like it's shining? Now lets go up to the bust part of the dress. Select a random shape like so in the image below:

Pick a light grey and keep the transparency set and start over lapping the grey blotches until they look like a shadow from zoom out.
Look at the strap part of the dress. Shift Select random zig-zag shapes on both strap and color them in with a white. Again, keep the transparency set on 92. When you have finished that, it should look something like this:

Great! Now we are going back down to the skirt part. Select a part so it looks like the image below and with a darker grey. Change the transparency to 72. Color in the selection until you are satisfied.

It should look something like above. I only shaded it in once. you are going great! The dress will look more realistic as you go on, so keep trying.

Now, as you can see I selected a part again. Change your color to white and set the transparency to 89 and color in the selection one coat.

And you are done your dress :)
Your results should look like this and they will be good. I did not use the lighten or darken tool, and that is a life saver.
Really!
coming soon - make your own shoe
Eliza
Tutorial - How To Make Your Own Poses
http://www.topshareware.com/PhotoStudio-download-13795.htm Download and install for this tutorial to work.

 Ok, so you just installed PhotoStudio. So what you need to do is Put your medoll on a white background and make her half size(so the same size as the rotation of her). Screen shot it and cut out the head to the top of the shoulders.
Now, open PhotoStudio and then with the open option, open the picture of your medoll's head. Get rid of the hair and the face with the free select tool and make her look bald. (you can click where to go with it.)
Now, make the body. (Making this body was an example, once you think you are ready you can make your own poses.)

Start at the shoulders and make one arm. The arm can go in which ever direction it wants, just keep it down for now. Now as you see in the picture about I drew a whole torso with the select tool. To do this once you are done with the arm double click and then start the rest of the picture with the free select tool. Before you finish what you want make sure you hold in shift while double clicking. Color in your selection the same tone as your doll's original skin.
Now to put in the breasts and other details, see the pre-shading under the neck? Dark, Medium, Light? Well get the paint brush and hold shit. This will make the eyedrop tool appear. Select the light shading and then get the free select tool again.
Make detail curves for the tits and other parts so it will look like this :
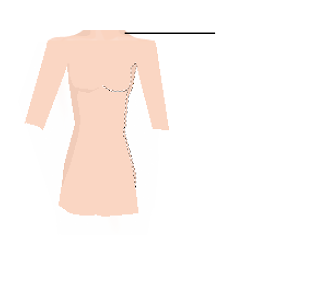


-POSES-

 Ok, so you just installed PhotoStudio. So what you need to do is Put your medoll on a white background and make her half size(so the same size as the rotation of her). Screen shot it and cut out the head to the top of the shoulders.
Now, open PhotoStudio and then with the open option, open the picture of your medoll's head. Get rid of the hair and the face with the free select tool and make her look bald. (you can click where to go with it.)
Now, make the body. (Making this body was an example, once you think you are ready you can make your own poses.)

Now to put in the breasts and other details, see the pre-shading under the neck? Dark, Medium, Light? Well get the paint brush and hold shit. This will make the eyedrop tool appear. Select the light shading and then get the free select tool again.
Make detail curves for the tits and other parts so it will look like this :

you can see what shade you should use where the black line is pointing
Now, start doing the legs. They are probably the easiest thing you can do in graphics ( feet and hands are the hardest. )First, do just one leg.then make another one and overlap it like it shows in the picture below and use the shift selecting way. Once you have done both legs the selection should look like this.

Color the legs in and then do the feet. The feet shouldn't need a how to make them as they are so fast to do in this pose. Well, you only do one.
ow finish off the arms and do the hands. The hands get easier once you get the hang of it. The hand should look something like this once you got the selection.

Color it in and then do the other arm and hand.
Nearly done. Now with the smudge tool go around the edges that need touching up for a perfect pose. And the finish product :
Nearly done. Now with the smudge tool go around the edges that need touching up for a perfect pose. And the finish product :

Now, copy and paste hairstyles, faces, and even make your own clothes and shoes for the pose. It is all up to you.
coming soon
Make Your Own Clothing with PhotoStudio
Saturday, December 26, 2009
Free For All To Use plus Tutorial Coming Soon
So I am being generous here. Notice my copyrights? Now they come in handy hey?
It says you can only use my work with my permission, so, for the graphics on THIS POST
you can use as your own as many times as you want. If you would like a different pose, get a real life picture of the pose you admire and send it to me and I will do it in all skin tones. (contact me fore more details)
you can use as your own as many times as you want. If you would like a different pose, get a real life picture of the pose you admire and send it to me and I will do it in all skin tones. (contact me fore more details)
if would would like me to do a graphic for you, just ask and i will be more than happy to


Tutorial Coming Soon...
Subscribe to:
Posts (Atom)